If you’ve been following my blog, you know that I am a huge fan of mixed media. My two most favorite things to do are painting and embroidery so I love to find new and satisfying ways to combine these two things. After creating a portrait from an oil painting, (click HERE to see that post.) I decided to try my hand at a watercolor portrait highlighted with some whimsical embroidered touches. It evolved a little differently than I expected but it was so fun and I really learned a lot .
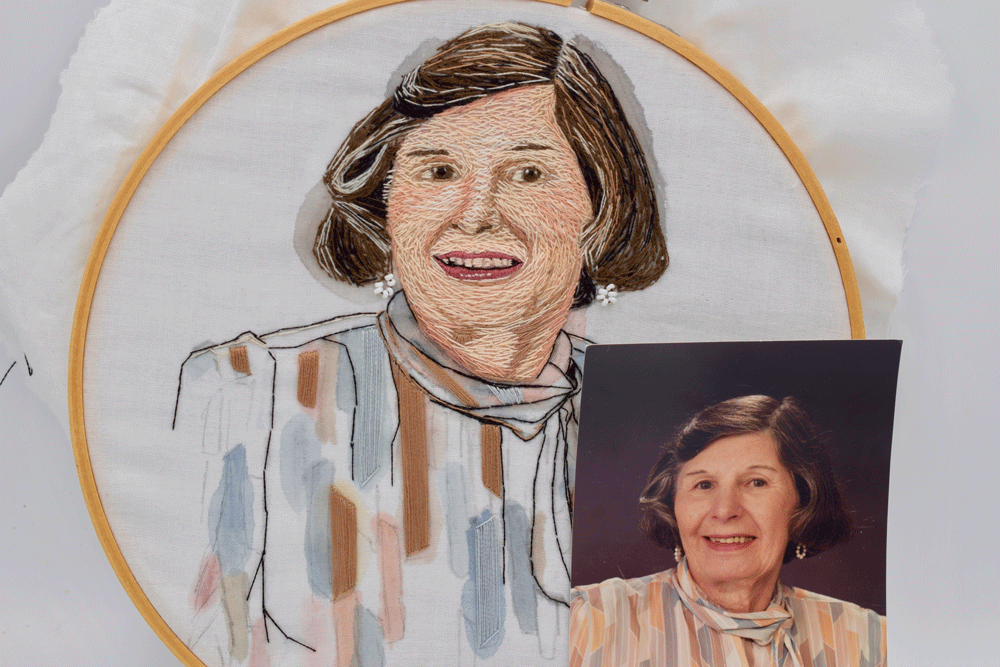
First I found a subject/victim (Haha) to paint. This is my grandmother. I have such wonderful childhood memories of spending time with her.! I knew it would be easy and pleasant to focus on this face discovering all its subtle nuances.


Believe it or not, this particular fabric was once a bedsheet. It ripped down the center so I have been cutting it up and using it in my embroidery projects. It has a higher thread count than I would normally use so it is incredibly soft, thus the bleed factor of the paint. I really liked this effect but my family was less than impressed. They are my most favorite critics because I always get the raw truth and so appreciate that! One thing I thought would be interesting to point out is that the less water on the brush and more pigment, the less bleed (See the black highlight on the scarf?) but it is hard to blend that way and has more of a sketch-like effect.

When I first envisioned this project, I thought I would just be doing some simple and whimsical embroidered highlights but couldn’t resist the urge to do the whole face. You will see later that I ended up doing the face but then just added simple highlights to the body. One thing I forgot to do is to add a piece of stabilizer to the back of of the fabric. This will help with keeping the stitching from cinching and warping. By stabilizer, I mean you could add an iron-on interfacing to the “wrong” side of the fabric or even more simple, you can just use another piece of cotton fabric under the one you are sewing. Just place them both between the hoop together, tighten them by gently pulling around the edges of the hoop until the fabric is taut and start stitching!

I got really into it so I kept forgetting progress shots but after I finished the face, I tackled the hair.


As I was working it dawned on me that it would be great to include some beads from her jewelry box. She had this lovely jewelry box on a dressing table in her bedroom. It had a pile of costume jewelry in it and I spent hours sifting through it and trying it all on as a little kid. It has nothing of value but it is still one of my most treasured possessions.


I love to sift through what is left of this little collection. The old fashioned hair pins just make me so happy! The delicate white beaded white necklace in the front right unraveled a long time ago and those little white beads would make the PERFECT earrings for her.

Before adding the earrings, added some embroidered highlights to the blouse but just outlining in a single thread of black.

I added some of the stripes on her her shirt and the earrings. I still like the way the paint bleeds out around the edges and the look of the highlighted blouse. The mouth and left cheek area were problematic. That area of the fabric got warped and changed shape and it looks a little wonky but I had such a great time working on and learning from this! I am still going to try again to create a portrait that is more subtle with hints of embroidery. I find it so hard to hold back with my ‘more is more’ line of thinking but I love the look of the blouse. I may still work on trying to square the jaw a little but I think there is a point, just like in painting, that overworking an area can ruin it so you have to know when to call it quits.

One thing I really liked about embroidering over the watercolor was that it had the effect of an underpainting (literally and figuratively). It gives a base of color for the embroidery. It would change the look of the threads to have a stark white underneath them. It would be interesting to explore that, as well.
I have always wanted to tackle portraits and have a long way to go in the learning process! I will say that an open mouth with teeth showing can be particularly challenging but I think it’s great to show works that are successful and others that are not as successful. It is all a part of the whole process and the unsuccessful pieces are the ones you learn the most from by questioning and curiosity!
Cheers to your creative journey!
Thanks for stopping by and coming along for the ride.
Warmly,
Pam
P.S. I also tried a ‘less is more’ approach with the first watercolor painting but it’s not quite there yet.

I am planning on adding some cherry blossoms. She had a beautiful one in her yard that was a gorgeous springtime show and whenever I see pink cherry blossoms it’s a little wink we share.