I love to embroider so I am always looking for new things to make with my creations. I really enjoy wearing bracelets so I decided for today's post to make a wrist cuff. I'll take you through step-by-step. It's really pretty easy when you break it down.
First you have to choose an embroidery design. I thought immediately of my ROSE PATTERN. It is long and thin which is perfect for a bracelet pattern. Click HERE to see the listing if you would like to use this pattern for your bracelet. You don't have to use a pattern at all though! You can just use some freehand stitches and make your very own unique creation.
FEATHER STITCH - Would be a great stitch to try. Just layer the stitches over each other in different colors.
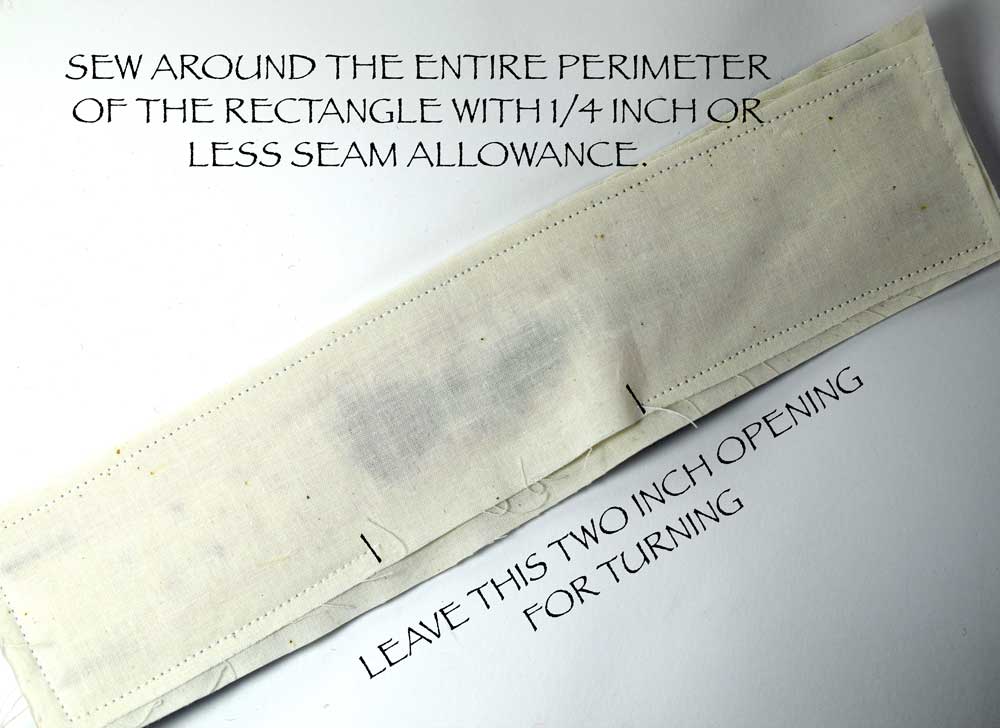
LAZY DAISY STITCHES - Would be great here as well. Make a few flowers connected by a vine of BACKSTITCH or STEM STITCH. If you are using my same measurements, keep your design to 2 x 9 inches and centered on your fabric. You could mark a rectangle with vanishing ink if this helps.
Once you have chosen a design motif, gather together your supplies;

Here is what I used to make my wrist cuff:
SEW ON SNAPS - I love the idea of adjusting my cuff to fit my wrist exactly. These sew in snaps were perfect for that reason. You could also sew on velcro or even a button on one side and a loop on the other. I found these snaps in the sewing section of my local craft store. Sometimes they even carry them at your local grocery store in the hardware/sewing section if you have one.
FABRIC PIECE FOR EMBROIDERY DESIGN - I just used unbleached muslin for my design. It is cheap and easy to find and nice and light. (FYI, in other countries this is sometimes called unbleached calico. It is an off white cotton fabric). I often add a piece of fusible bond to the back of muslin. It makes the fabric less see through so you can't see the stitches and it also gives the fabric a little structure. HERE is an example of fusible bond. You simply iron the textured side to the wrong side of the fabric (follow the easy package instructions). I used a 4 x 12 piece. I centered my design in the middle, thereby giving myself room to cut out a 2 x 9 inch rectangle (My finished cuff is about 1 3/4 inches by 8 3/4 inches.)
PIECE OF FELT TO USE AS BATTING - I used a 2 x 9 inch rectangle to use as my batting.
PIECE OF FABRIC BACKING - I chose unbleached muslin as my backing fabric to match the front. this piece should be the same size as the felt batting so this piece was also 2 x 9.
THREAD - I like to use DMC six stranded embroidery thread. You will use the thread to create your embroidery design but also to attach the batting to the embroidered piece.
SCISSORS - A nice sharp little pair for thread cutting.
NEEDLE - My needle of choice is an embroidery/crewel needle that is size 8 or larger.

Grab your 4 x 12 inch piece of fabric that you have centered your embroidered design on, a needle, thread and the 2 x 9 inch piece of felt batting. We will be using a decorative stitch and some french knots to attach the felt batting to the back of the embroidered fabric.


Now you will attach the fabric to the felt batting by making some decorative stitches. I chose to create some lines down the length of the fabric on either side of the rose and then added a whole bunch of french knots to anchor it all down. Make sure that you leave over 1/4 inch for a seam allowance. You will be sewing around the perimeter so you do not want all your pretty stitches to get sewn into the seam!


Adding evenly distributed french knots helps to evenly attach the fabric to the backing. I absolutely love the ombre look if the variegated thread.


That's it!

Here is the back. The snaps are underneath neatly hidden away.

Hope you give it a try. In the end you have a very unique wearable piece of art. This would also be a great gift for your artsy friend.
Thanks for stopping by!
Warmly.
Pam